大家好啊,今天来聊一聊transformers…这里指的不是 Attention is All You Need 里提出的transformers理论,而是由Huggingface开源的一个叫🤗 Transformers 的库
transformers是一个巨大无比的仓库,大量主流的开源模型都在transformers上有代码实现。而且,像vllm这样的推理框架,也是基于transformers开发的。简单来说,通过transformers,你可以(相对)轻松地调用各种开源模型进行推理,或者训练/微调出适合自己的模型。更重要的是,transformers完全开源,并且有着相对清晰的项目结构,不管是作为学习大模型的材料还是新的模型开发的框架都非常合适。
使用pipeline进行推理
首先要进行环境配置
1
2
3
| pip install transformers datasets evaluate accelerate
pip install torch
|
使用transformers最简单的方法就是通过pipeline类。基本上,transformers将大模型的任务分成了几类,你只需要在初始化pipeline的时候告诉它你要执行什么任务,它就会帮你初始化默认的模型和分词器,然后只要把输入通过参数传递给pipeline实例就可以得到推理结果了。比如下面的代码就是用pipeline调用一个文本分类模型的实例
1
2
3
4
5
6
7
| from transformers import pipeline
classifier = pipeline("sentiment-analysis")
print(classifier("We are very happy to show you the 🤗 Transformers library."))
|
pipeline支持的任务如下表:
暂时无法在飞书文档外展示此内容
这个时候我们不难发现,pipieline是一个类似interface的东西,按照不同的任务提供了不同的“接口”。那自然地,我们大部分时候会想要指定某个任务所使用的具体的模型,通过给pipeline传递model参数可以实现这一点。
Use a pipeline as a high-level helper
1
2
3
| from transformers import pipeline
pipe = pipeline("text-generation", model="meta-llama/Llama-3.2-3B")
|
用更底层的方法进行推理
pipeline只是transformers基本的推理功能的一个高层封装,如果想要更好地利用transformers进行推理,就应该在代码中手动实现以下步骤:
- 加载模型(Model)
- 加载分词器(Tokenizer)
- 准备数据
- 使用分词器对数据进行分词,得到模型可以用来计算的input
- 将数据传入模型,开始推理
- 获得模型的输出,并decode(tokenizer.decode)
具体地,如果我们想要用llama来进行对话任务,我们可以这样做:
1
2
3
4
5
6
7
8
9
10
11
12
13
14
15
16
17
18
19
20
21
22
23
24
25
26
27
28
29
30
| from transformers import AutoTokenizer, AutoModelForCausalLM
path="meta-llama/Llama-3.1-8B-Instruct"
tokenizer = AutoTokenizer.from_pretrained(path)
model = AutoModelForCausalLM.from_pretrained(path)
text="Hey, how many 'r's are there in the word 'strawberry'?"
messages = [
{"role": "system", "content": "You are a bot that responds to questions"},
{"role": "user", "content": text}
]
prompt = tokenizer.apply_chat_template(messages, \
add_generation_prompt=True, tokenize=False)
input = tokenizer(prompt)
output = model.generate(
**input,
max_new_tokens=50,
)
context_length = input.input_ids.shape[-1]
sequence = output['sequences'][0][context_length:]
pred = tokenizer.decode(sequence, skip_special_tokens=True)
print(pred)
|
微调
使用 🤗 Transformers 的 Trainer 可以微调预训练模型。以bert模型的微调为例:
1
2
3
4
5
6
7
8
9
10
11
12
13
14
15
16
17
18
19
20
21
22
23
24
25
26
27
28
29
30
31
32
33
34
35
36
37
38
39
40
41
42
43
44
45
46
47
48
49
50
51
52
| from datasets import load_dataset
dataset = load_dataset("yelp_review_full")
dataset["train"][100]
from transformers import AutoTokenizer
tokenizer = AutoTokenizer.from_pretrained("google-bert/bert-base-cased")
def tokenize_function(examples):
return tokenizer(examples["text"], padding="max_length", truncation=True)
tokenized_datasets = dataset.map(tokenize_function, batched=True)
small_train_dataset = tokenized_datasets["train"].shuffle(seed=42).select(range(1000))
small_eval_dataset = tokenized_datasets["test"].shuffle(seed=42).select(range(1000))
from transformers import AutoModelForSequenceClassification
model = AutoModelForSequenceClassification.from_pretrained("google-bert/bert-base-cased", num_labels=5)
from transformers import TrainingArguments
training_args = TrainingArguments(output_dir="test_trainer")
import numpy as np
import evaluate
metric = evaluate.load("accuracy")
def compute_metrics(eval_pred):
logits, labels = eval_pred
predictions = np.argmax(logits, axis=-1)
return metric.compute(predictions=predictions, references=labels)
trainer = Trainer(
model=model,
args=training_args,
train_dataset=small_train_dataset,
eval_dataset=small_eval_dataset,
compute_metrics=compute_metrics,
)
trainer.train()
|
理解Special Tokens
你可能会有些好奇,apply_chat_template对我们的输入做了什么修改。实际上,主要的修改体现在special token的添加上
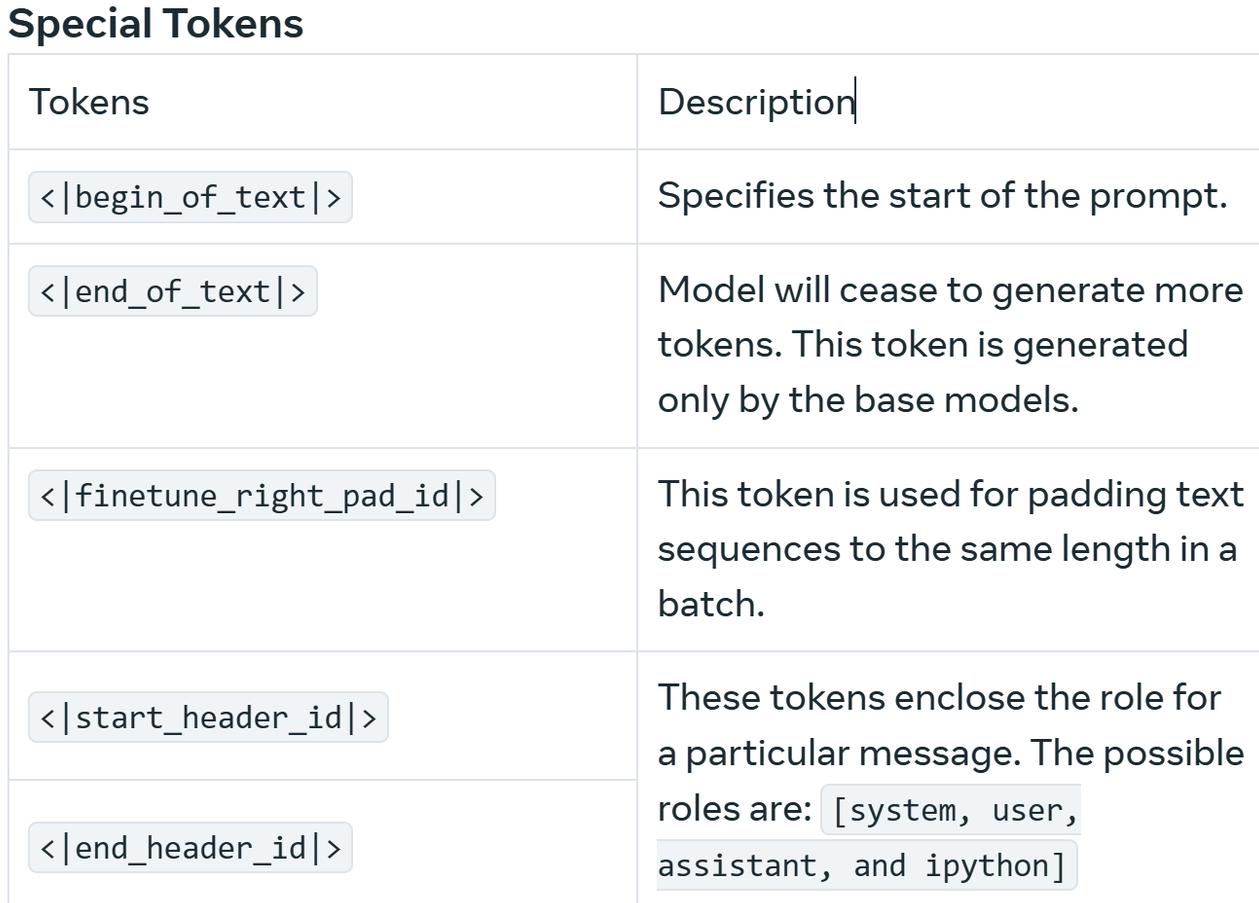
什么是special token? 基本上,它们是模型在训练过程中学习到的具有特殊意义的token,用来标识各种与对话相关的信息。比如,llama3.1的部分special tokens如下:
而我们上面的对话,在加了special tokens之后的文本看起来是这样的:
1
2
3
4
5
6
7
8
| <|begin_of_text|><|start_header_id|>system<|end_header_id|>
You are a bot that responds to questions.
<|eot_id|><|start_header_id|>user<|end_header_id|>
Hey, how many 'r's are there in the word 'strawberry'?<|eot_id|>
<|start_header_id|>assistant<|end_header_id|>
|
为什么要加上special token呢?
我们以上面例子中出现的special tokens为例子解释。我们首先要明确一点,transformers架构的大模型的工作方式,是根据已有文本,补全下一个最有可能出现的文本。也就是说,如果向模型输入1+1=,那么下一个最有可能的文本就是2。对于问答任务来说,我们并不希望模型“补全”我们的问题,而是希望模型能对我们的问题做出回答,这个时候,我们就要在训练过程中区分开属于不同角色的文本,<|start_header_id|>和<|end_header_id|>就起到了这样的作用。这样训练之后,模型就知道了,在<|start_header_id|>assistant<|end_header_id|>这一行的后面,需要补全的是模型的回答,而不是用户提出的问题的延续。
可以尝试去掉上面例子中的apply_chat_template那一行,然后看看会发生什么
关于transformers的代码实现
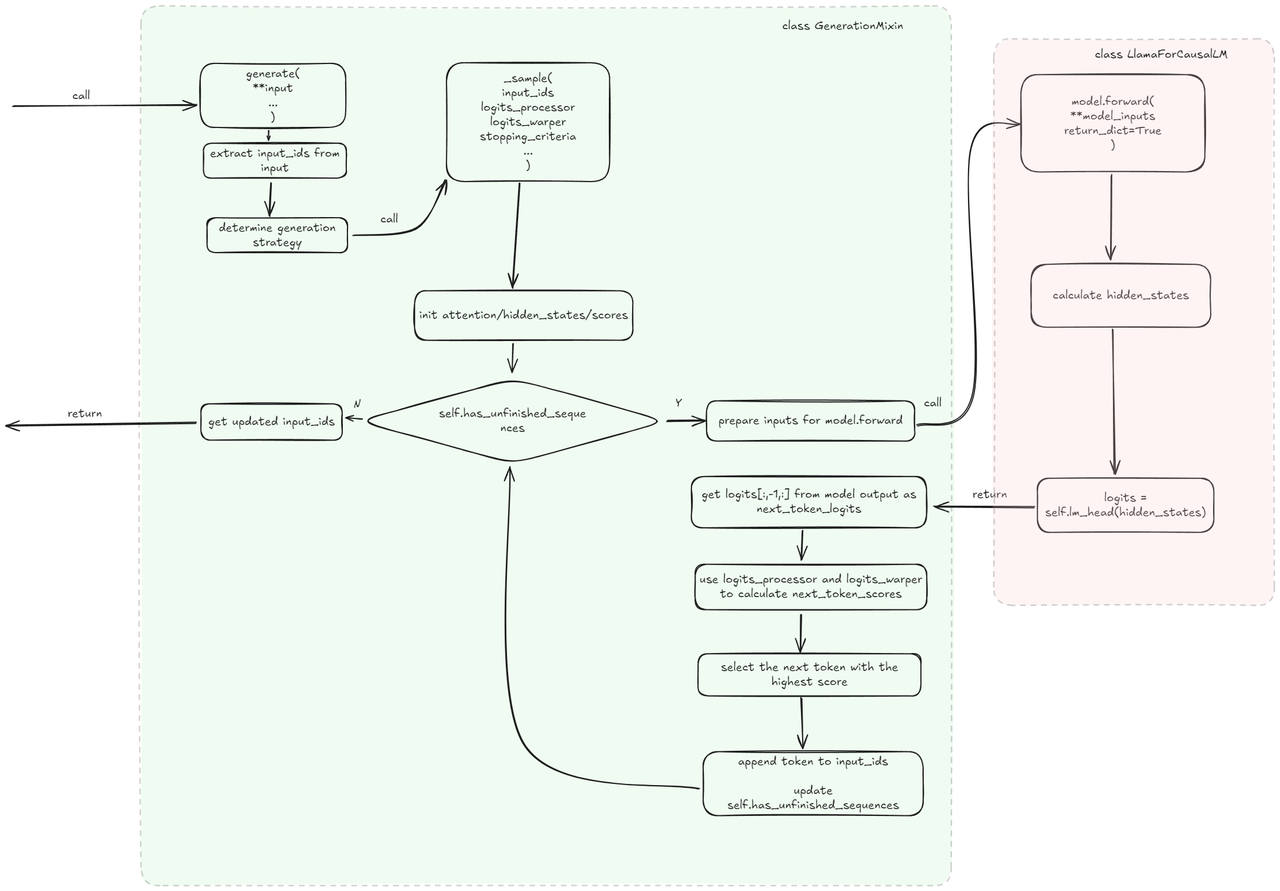
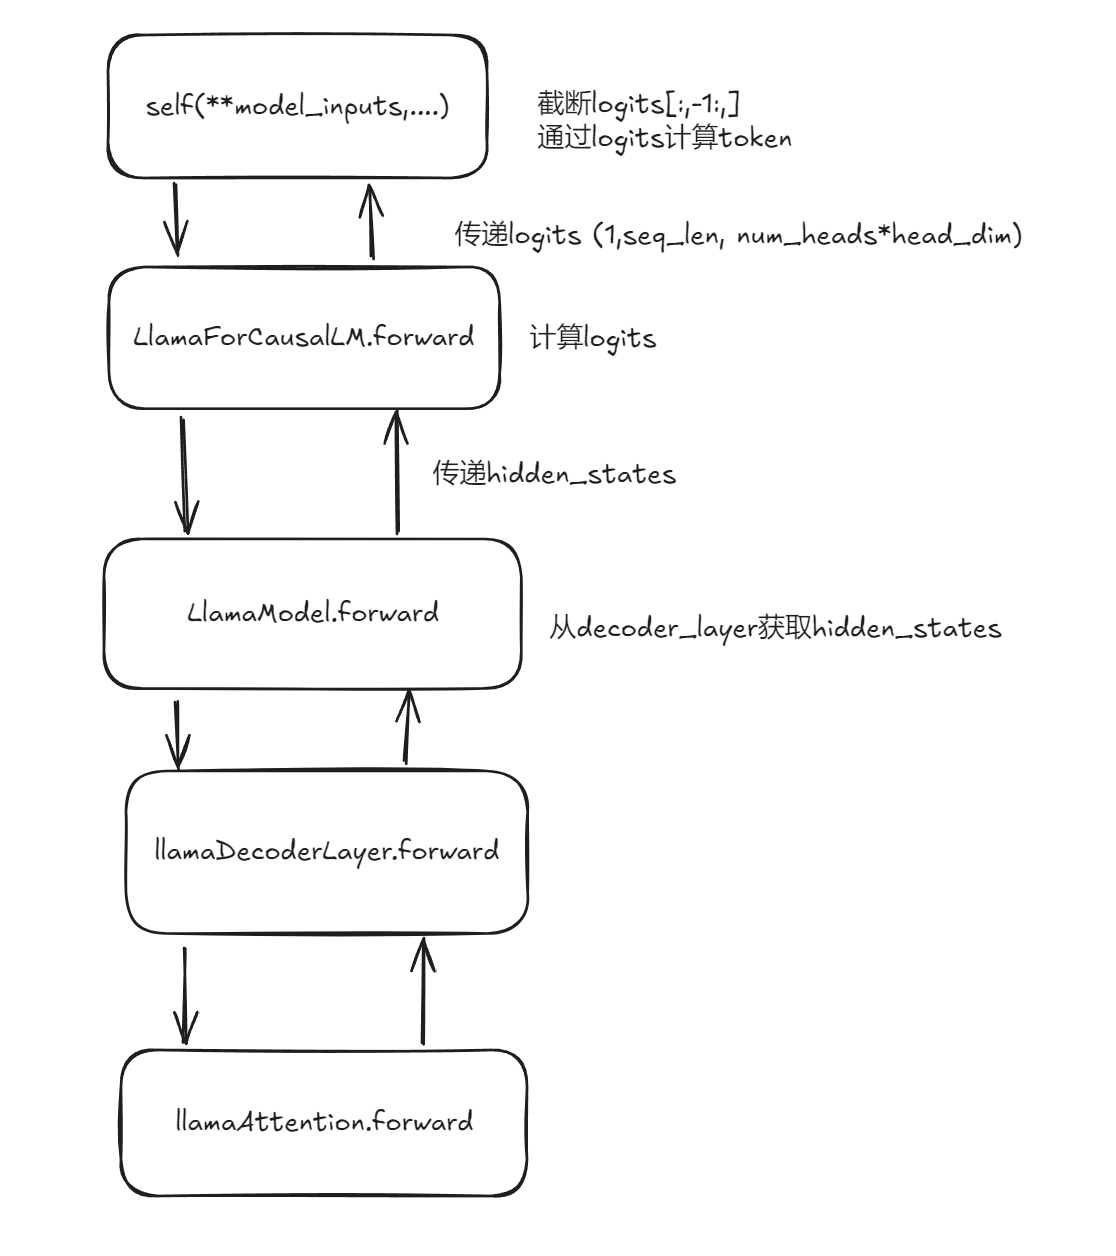
transformers的代码结构,大致就是从GenerationMixin类开始,一层一层地往下嵌套:
如果我们想要对底层的一些代码进行修改的话,一种方法是使用python的一个叫做monkeypatch的语言特性。具体地,我们可以通过下面的方法,使得forward函数被调用时,跳转到我们自定义的forward函数:
1
2
3
4
5
6
7
8
9
10
11
12
13
14
15
16
17
18
19
| import transformers
def my_prepare_inputs_for_generation_llama(
self, input_ids, past_key_values=None, attention_mask=None, inputs_embeds=None, **kwargs
):
...
return model_inputs
def original_llama_flash_attn_2_forward(
self,
hidden_states: torch.Tensor,
...
):
return attn_output, attn_weights, past_key_value
def replace_llama():
transformers.models.llama.modeling_llama.LlamaForCausalLM.prepare_inputs_for_generation = my_prepare_inputs_for_generation_llama
transformers.models.llama.modeling_llama.LlamaFlashAttention2.forward = my_flash_attn_forward_llama
replace_llama()
|
参考
https://huggingface.co/docs/transformers/main/zh/index
https://huggingface.co/docs/transformers/main/zh/quicktour
https://huggingface.co/docs/transformers/main/zh/training
https://huggingface.co/meta-llama/Llama-3.1-8B-Instruct
https://github.com/huggingface/transformers
https://www.llama.com/docs/model-cards-and-prompt-formats/llama3_1/
https://www.n2ptr.space/how_does_model_generate_work/